Battle of Gazala
Lua error in package.lua at line 80: module 'strict' not found. The Battle of Gazala (near modern town of Ayn al Ghazālah) was fought during the Western Desert Campaign of the Second World War, around the port of Tobruk in Libya from 26 May to 21 June 1942. The combatants on the Axis side were the Panzerarmee Afrika (Colonel-General Erwin Rommel), consisting of German and Italian units and the Allied forces of the Eighth Army (Lieutenant-General Neil Ritchie) under the supervision of the Commander-in-Chief Middle East, General Sir Claude Auchinleck. The Axis distracted the British with a decoy attack in the north and made the main attack round the southern flank of the Gazala position. The advance succeeded but the defence of the French garrison of Bir Hakeim at the southern end of the line left the Axis with a long and vulnerable supply route behind the British line.
Rommel retired to the Cauldron, a defensive position backing onto the British minefields, forming a base in the midst of the British defences and created a route through to the Axis side to receive supplies. When the Eighth Army counter-attacked the operation was poorly co-ordinated and was defeated in detail, many tanks were lost and the Axis were able to regain the initiative. The British withdrew from the Gazala line and the Axis troops overran Tobruk in a day; the battle is considered the greatest victory of Rommel's career. Rommel exploited the success by pursuing the British into Egypt, denying them time to recover from the defeat. As both sides neared exhaustion, the Eighth Army managed to check the Axis advance at the First battle of El Alamein.
Contents
Background
Operation Theseus

Following Operation Crusader, in late 1941, the Eighth Army had relieved Tobruk and driven the Axis forces from Cyrenaica to El Agheila. The Eighth Army advance of 800 kilometres (500 mi) over-stretched its means of supply and in January 1942, the British reduced the front line garrison, to work on lines of communication and supply dumps, preparatory to another westwards advance against Tripolitania. The elimination of Force K from Malta, which ran into an Italian minefield off Tripoli in mid-December and the arrival of Fliegerkorps II in Sicily, neutralised the air and naval forces in Malta and more Axis supplies reached Libya.[1] After a two-month delay, the Axis forces in Libya began to receive supplies and reinforcements in men and tanks, which continued until the end of May, when Fliegerkorps II was withdrawn to the Russian front.[2]
While aware from signals intelligence of these reinforcements, GHQ in Cairo underestimated their significance and Axis fighting strength, having greatly exaggerated the casualties inflicted on the Axis during Operation Crusader.[3] In an appreciation made in January 1942, Auchinleck alluded to an Axis fighting strength of 35,000 men, when the true figure was about 80,000 (50,000 German and 30,000 Italian troops).[4] The Eighth Army expected to be ready by February and GHQ Cairo believed that the Axis would be too weak and disorganised to mount a successful counter-offensive in the meantime.[5] On 21 January, Rommel sent out three strong armoured columns to make a tactical reconnaissance. Finding only the thinnest of screens, Rommel changed his reconnaissance into an offensive, recaptured Benghazi on 28 January and Timimi on 3 February. By 6 February the British had fallen back to a line from Gazala to Bir Hakeim, a few miles west of Tobruk, from which the Italo-Germans had retired seven weeks before. The British had 1,309 casualties from 21 January, lost 42 tanks knocked out and another 30 through damage and breakdowns and forty field guns.[6]
Gazala Line
Between Gazala and Timimi (just west of Tobruk), the Eighth Army was able to concentrate its forces sufficiently to turn and fight. By 4 February, the Axis advance had been halted and the front line had been stabilised, from Gazala on the coast 48 km (30 mi) west of Tobruk, to an old Ottoman fortress at Bir Hakeim, 80 km (50 mi) to the south. The Gazala Line was a series of defensive boxes accommodating a brigade each and laid out across the desert behind minefields and wire, watched by regular patrols between the boxes. The Free French were to the south at the Bir Hakeim box, 13 miles (21 km) south of the 150th Infantry Brigade box, which was 6 miles (9.7 km) south of the 69th Infantry Brigade box. The line was not evenly manned, with a greater number of troops covering the coast road, leaving the south less protected but the line was behind deep minefields and a longer line would make an attack around the southern flank harder to supply. Behind the Gazala Line were boxes at Commonwealth Keep, Acroma, Knightsbridge and El Adem, sited to block tracks and junctions. The box at Retma was finished just before the Axis offensive but work on the Point 171 and Bir el Gubi boxes did not begin until 25 May.[7]
Prelude
British preparations

Churchill pressed Auchinleck to attack to push the Axis out of Cyrenaica and relieve the pressure on Malta, which Churchill felt was essential to the war effort,
<templatestyles src="Template:Blockquote/styles.css" />
...having particular regard to Malta, the loss of which would be a disaster of the first magnitude to the British Empire, and probably fatal in the long run to the defence of the Nile delta.
— Winston Churchill[8]
The British received new equipment, including 167 Grant tanks equipped with a 75 mm gun, and large numbers of 6-pounder anti-tank guns.[9] Rommel thought that Allied minefields ended well north of Bir Hakeim and did not know of the "mine marsh" surrounding the box.[9] The Eighth Army was in the process of reorganising, changing the relationship between infantry and artillery, while the RAF commander Arthur Tedder concentrated the efforts of the Desert Air Force (DAF) on supporting the troops on the ground. Army commanders lost the power to direct air operations, which was reserved for the air commanders. A new fighter-bomber concept was developed and Air Vice-Marshal Arthur Coningham, commander of the DAF, moved his headquarters to the Eighth Army HQ to improve communication.[10]

Rommel and the other Axis commanders, knew that the entry of America into the war would give the Eighth Army access to a huge quantity of supplies and equipment but despite the British superiority in numbers of tanks, guns and aircraft, the Axis could expect more Allied supplies to arrive slowly, creating an opportunity to forestall an Allied offensive. The "Tiger Convoy" of May 1941, had run the gauntlet of the Mediterranean, instead of the safer route around the Cape of Good Hope, to deliver tanks and ammunition. The convoy lost one ship but the gamble saved forty days in transit, in time for the supplies and equipment to be used in Operation Battleaxe. After "Tiger", convoys sailed around the Cape of Good Hope, a journey of about 23,000 km (14,000 mi).[11][12]
By late May, on the Gazala Line were 1st South African Division nearest the coast, 50th (Northumbrian) Infantry Division to the south and 1st Free French Brigade furthest south at Bir Hakeim. The 1st and 7th Armoured Divisions waited behind the main line as a mobile counter-attack force, the 2nd South African Division formed a garrison at Tobruk and the 5th Indian Infantry Division (which had arrived in April to relieve 4th Indian Infantry Division) was held in reserve. The British had 110,000 men, 843 tanks and 604 aircraft.[13][14]
Axis preparations

The Axis retreat to El Agheila after the Operation Crusader, reduced the supply distance from Tripoli to 740 kilometres (460 mi), the arrival of a second battleship convoy on 6 January 1942 and the discovery of 13,000 tonnes (13,000 long tons) of fuel at Tripoli, eased the supply crisis, despite the delivery of only 51,000 tonnes (50,000 long tons) of supplies in January. The Panzerarmee had room to manoeuvre and a much shorter supply line, against an enemy with the burden of an over-extended supply line. The arrival of Luftflotte II in Sicily had also regained Axis air superiority in the region. Rommel asked for another 8,000 lorries but this utopian demand was rejected and Rommel was warned that an advance would cause another supply crisis. On 29 January, the Panzerarmee recaptured Benghazi and next day ammunition supply to the front line failed. By 13 February, Rommel agreed to stop at Gazala, 1,400 kilometres (900 mi) from Tripoli.[15]
Until May, monthly deliveries averaged 61,000 tonnes (60,000 long tons), fewer than the smaller Axis force received from June–October 1941 but sufficient for an offensive. The 1,400 kilometres (900 mi) advance to Gazala succeeded because Benghazi was open, reducing the transport distance for about 33% of the supplies of the Panzerarmee to 450 kilometres (280 mi). The Italians tried to restrain Rommel by advocating the capture of Malta, which would postpone another offensive in Africa until the autumn but agreed to an attack on Tobruk for late May. An advance would stop at the Egyptian frontier, another 240 kilometres (150 mi) east and the Luftwaffe would redeploy for Operation Herkules. The capture of Malta would not alter the constraints of port capacity and distance; protecting convoys and a large port close to the front, would still be necessary for a decisive victory.[16]
Air attacks directed by Kesselring on Malta, reduced its offensive capacity and supply convoys from Italy reached the Axis forces in Africa.[17] Unternehmen Venezia (Operation Venice), the Axis plan of attack, was for tanks to make a flanking manoeuvre south of the fortified "box" at Bir Hakeim.[18] On the left flank, the Italian 132 Armoured Division Ariete would neutralise the Bir Hakeim box and on the right flank, the 21st Panzer Division and 15th Panzer Division would advance north behind the Eighth Army defences, to destroy the British armour and cut off the infantry divisions on the Gazala line. On the far right of the attacking formation, a 90th Light Afrika Division Battle Group was to advance to El Adem, to the south of Tobruk, cut the line of supply from the port to the Gazala Line and hold Allied troops at Tobruk by simulating a strong armoured force, using dust machines made from aircraft-engines and propellers mounted on trucks.[19]
The rest of the Italian XX Motorized Corps, the Italian 101st Motorized Division Trieste, would open a gap in the minefield north of the Bir Hakeim box near the Sidi Muftah box, to create a supply route to the armour. Rommel anticipated that having dealt with the British tanks, he would have captured El Adem, Ed Duda and Sidi Rezegh by nightfall and the Knightsbridge defensive box, about 40 km (25 mi) north-east of Bir Hakeim. The Axis tanks would be in a position to thrust next day, west against the Eighth Army defensive boxes between Gazala and Alem Hamza, meeting the eastwards attack by the Italian X and XXI corps.[20] By late May the Axis forces comprised 90,000 men, 560 tanks and 542 aircraft.[13][14]
Battle
Operation Venice

At 14:00 on 26 May, the Italian X and XXI Corps, after a heavy artillery concentration, launched a frontal attack on the central Gazala positions. A few elements of the Afrika and XX Mobile Corps were attached to these assault groups, and during the day the bulk of the Afrika Korps moved to give the impression that this was the focus of the Axis assault. When darkness fell the armoured formations turned south in a sweeping move around the southern end of the Gazala line.[21]
In the early hours of 27 May, Rommel led the elements of Panzer Army Afrika—the Afrika Korps, the Italian XX Motorised Corps and the German 90th Light Afrika Division—in a bold flanking move around the southern end of the Allied line, using the British minefields to protect the Axis flank and rear. The Ariete division of XX Motorized Corps was held up for about one hour by the 3rd Indian Motor Brigade of the 7th Armoured Division, dug in some 6 kilometres (3.7 mi) south east of Bir Hakeim, then overcame the defenders who lost 440 men killed and wounded and about 1,000 prisoners, including Admiral Sir Walter Cowan along with most of its equipment. The Italians lost 23 tanks, some of which were repairable on the field, 30 men killed and 50 wounded.[22][23][24] The 21st Panzer Division was advancing south of the position and did not take part in the action.[25][26][27]
Further to the east, the 15th Panzer Division had engaged the 4th Armoured Brigade of the 7th Armoured Division, which had been ordered south to support the 3rd Indian and 7th Motorised Brigades. In a mutually-costly engagement, the Germans were surprised by the range and power of the 75 mm guns on the new M3 (Grant) tanks.[28][29] The 4th Armoured Brigade then withdrew toward El Adem and spent the night near the Belhamed supply base east of El Adem.[28] By late morning, the Axis armoured units had advanced more than 25 mi (40 km) north but by midday, were stopped by the 1st Armoured Division, in more mutually-costly fighting.[28]

On the far right of the Axis advance, the 90th Light Afrika Division engaged the 7th Motorised Brigade at Retma and forced it to withdraw eastwards on Bir el Gubi.[30] Resuming their advance toward El Adem at mid-morning, armoured cars of the 90th Light came upon the advanced HQ of 7th Armoured Division near Bir Beuid, dispersing it and capturing a number of officers including the commander, Frank Messervy, who pretended to be a batman and escaped.[31] The "inexcusable" lapse in security, left the division without effective command for the next two days.[28] As planned, 90th Light division reached the El Adem area by mid-morning and captured a number of supply bases. The following day, the 4th Armoured Brigade were sent to El Adem and the 90th Light was driven back to the south-west.[32]
The tank battle continued for three days and lacking possession of Bir Hakeim, Rommel drew the Afrika Korps into a defensive position, using the extensive Allied mine belts to block a British approach from the west. The British tanks repeatedly assailed the position from the north and east and were met by accurate return-fire. The Axis supply situation became desperate; defending the German rear, the Ariete Armoured Cavalry Division repulsed attacks by the British armoured brigades on 29 May and during the first week of June.[33]
Bir Hakeim
The Bir Hakeim box was defended by the 1st Free French Brigade under Marie-Pierre Koenig. On 27 May the Battle of Bir Hakeim started with the attack of the Ariete Division, which was a costly failure against the French 75 mm guns and mines.[33][34][35] On the night of 1/2 June, the 90th Light and Trieste divisions were sent south to renew the attack on Bir Hakeim, where the battle continued for another ten days.[36]
<templatestyles src="Template:Blockquote/styles.css" />
Our attacks repeatedly bogged down in the excellent French fortifications. During the first ten days of out [sic] attack against the French the British had remained amazingly calm. The "Ariete" Division alone was attacked by them on 2 June but it defended itself stubbornly. After a counter-attack by the 21st Panzer Division the situation there again became quiet.
— Generalmajor Alfred Toppe[36]
Reinforced with a further combat group, the Axis attacked Bir Hakeim again on 9 June and overran the defences by the following day.[37] Ritchie ordered the remaining troops to evacuate as best they could, under the cover of darkness.[38] Under fire through the night, many of the French were able to find gaps in the line through which to withdraw. The survivors then made their way some 8 km (5.0 mi) to the west, to rendezvous with transport from 7th Motor Brigade.[39] About 2,700 troops (including 200 wounded) of the original garrison of 3,600 escaped.[39] About 500 French troops, many of whom were wounded, were captured when the 90th Light Division occupied the position on 11 June.[40]
The Cauldron
Early on 29 May, supply vehicles supported by the "Trieste" and "Ariete" divisions, worked through the minefield north of Bir Hakeim and reached the Afrika Korps with supplies. On 30 May, Rommel pulled the Afrika Korps back westward against the edge of the minefields, creating a defensive position. A link was formed with elements of the Italian X Corps, which were clearing two routes through the minefields from the west.[41] In the process, the Sidi Muftah box was overrun and the 150th Infantry Brigade destroyed,
<templatestyles src="Template:Blockquote/styles.css" />
In the afternoon [30th May] I personally reconnoitred the possibilities for an attack on Got el Ualeb [the Sidi Muftah box], and detailed units of the Afrika Korps, 90th Light Division and the Italian Trieste Division for an assault on the British positions next morning. The attack was launched on the morning of the 31st May. German-Italian units fought their way forward yard by yard against the toughest British resistance imaginable.[...] Nevertheless, by the time evening came we had penetrated a substantial distance into the British positions. On the following day the defenders were to receive their quietus. After heavy Stuka attacks, the infantry again surged forward against the British field positions.[...] Piece by piece the elaborate British defences were won until by early afternoon the whole position was ours. The last British resistance was quenched. We took in all 3,000 prisoners and destroyed or captured 101 tanks and armoured cars, as well as 124 guns of all kinds.
— Rommel[42]
Acting on mistaken reports about German tank losses, Auchinleck strongly urged Ritchie to counter-attack along the coast, to exploit the absence of German tanks and break through to Timimi and then Mechili. Ritchie was more concerned by Tobruk, brought reinforcements up to the El Adem box and created new defensive boxes opposite the gaps in the minefield.[43] Ritchie ordered the Eighth Army to counter-attack against the Afrika Korps on 5 June but they were met by accurate fire from tank and anti-tank guns positioned in the cauldron. In the north, XIII Corps made no progress and the attack by 7th Armoured and 5th Indian divisions on the eastern flank of the cauldron, launched at 02:50, initially went well. An important element of the plan was the destruction of the Axis anti-tank screen with an artillery bombardment but because of an error in plotting the position of the German anti-tank screen, the bombardment fell too far to the east.[44] When 22nd Armoured Brigade advanced, it was met by massed anti-tank fire and the advance was checked.[45] The 32nd Army Tank Brigade, advancing from the north, joined the attack at dawn but also ran into massed fire, losing fifty of their seventy tanks.[46]

By early afternoon on 5 June, Rommel split his forces, deciding to attack east with the Ariete and 21st Panzer divisions while he sent elements of 15th Panzer Division northwards against the Knightsbridge defensive box.[47] The eastward thrust towards Bir el Hatmat dispersed the tactical HQs of the two British divisions, as well as the HQs of the 9th Indian Infantry Brigade, the 10th Indian Infantry Brigade and other smaller units, at which command and control broke down.[47] The 22nd Armoured Brigade, having lost 60 of its 156 tanks, was forced from the battlefield by renewed attacks from 15th Panzer. Of the Allied attackers, three Indian infantry battalions, a reconnaissance regiment and four artillery regiments were left behind. Unsupported by armour, they were overrun.[48]
Rommel continued to hold the initiative, maintaining his strength in the Cauldron while the number of operational British tanks diminished. A number of probes were sent to test the various opposing strong points and from 6–8 June, further attacks were launched on Bir Hakeim, which were repulsed by the French garrison. The 7th Motor Brigade and 29th Indian Infantry Brigade continued to harass the Axis lines of communications.[49]
Black Saturday, 13 June

On 11 June, Rommel pushed the 15th Panzer Division and 90th Light Afrika Division toward El Adem and by 12 June had forced the 201st Guards Brigade to withdraw from the Knightsbridge Box to the Tobruk perimeter.[31] The 29th Indian Infantry Brigade repulsed an attack on the El Adem box on 12 June but the 2nd and 4th Armoured Brigades on their left were pushed back 6 kilometres (3.7 mi) by the 15th Panzer Division and obliged to leave their damaged tanks on the battlefield. On 13 June, the 21st Panzer Division advanced from the west to join the battle, engaging the 22nd Armoured Brigade. The Afrika Korps demonstrated a superiority in tactics, combining tanks with anti-tank guns while on the offensive; Rommel acted rapidly on intelligence obtained from Allied radio traffic intercepts.[50] By the end of the day, the British tank strength had been reduced from 300 tanks to about 70 and the Afrika Korps had established armour superiority and a dominating line of positions, posing a severe threat to cutting off the XIII Corps units on the Gazala line.[51] By the end of 13 June, the Knightsbridge box was virtually surrounded and it was abandoned by the Guards Brigade later that night.[47] Due to these defeats, 13 June became known as "Black Saturday" to the Eighth Army.[52]
Rigel Ridge
On 13 June, the 21st Panzer Division attacked Rigel Ridge in the middle of a sandstorm.[53] The Germans overran part of the 2nd Scots Guards at the Knightsbridge Box at the west end of Rigel Ridge, overlooked by the 6th South African Anti-tank battery of the 2nd Field Regiment, Natal Field Artillery and a battery of the 11th Regiment RHA nearby. The South African gunners kept firing until their guns were destroyed, allowing the withdrawal of other Allied formations.[54] The South African battery commander had decided to stay and maintain fire against the German tanks, to delay the Germans for as long as possible. The remaining guns were commanded individually and fired at the Panzers over open sights. The German tanks took up positions behind the ridge, with anti-tank guns placed between them. A column of Panzers attacked from the rear, surrounding them and cutting off all escape and the gunners kept firing until the eight guns had been destroyed. About half the gun detachments were killed and wounded, including the battery commander and many officers. The last gun in action was manned by Lieutenant Ashley and a signaller; when the battery had been silenced, the enemy tanks approached cautiously and the South African gunners were taken prisoner. (The entire Natal Field Artillery Regiment was captured and was not re-formed until after the war.)[55] The Germans captured over 3,000 Allied prisoners.[56]
Eighth Army retreat
On 14 June, Auchinleck authorised Ritchie to withdraw from the Gazala line. The defenders in the El Adem and two neighbouring boxes held firm and the 1st South African Division was able to withdraw along the coast road, practically intact.[57] The road could not accommodate two divisions and the remaining two brigades of the 50th (Northumbrian) Division could not retreat eastwards because of the presence of the Axis armour so attacked south-west, breaking through the lines of the Brescia and Pavia divisions of X Italian Corps and headed south into the desert, before turning east to retreat.[58] It was clear to Auchinleck, that London would not contemplate a withdrawal to the better defensive positions around the Egypt-Libya frontier. On 14 June, Auchinleck ordered to Ritchie to hold a line running south-east from Acroma (west of Tobruk) through El Adem to Bir El Gubi.[59] By the evening of 15 June, the strong point at Point 650 had been overrun and on 16 June, the defenders at Point 187 had been forced by lack of supplies to evacuate. Throughout the day, the defensive boxes at El Adem and Sidi Rezegh were also attacked by the Afrika Korps. On 17 June, both were evacuated and any chance of preventing the encirclement of Tobruk vanished. Ritchie ordered the Eighth Army to withdraw to the defensive positions at Mersa Matruh, some 100 mi (160 km) east of the frontier, leaving Tobruk to hold out and threaten the Axis lines of communication, in much the same way as in 1941.[60]
Fall of Tobruk

Gott, the XIII Corps commander, appointed Major-General Klopper of the 2nd South African Division commander of the Tobruk garrison. In addition to the two South African brigades, he had the 201st Guards (Motorised) Brigade, 11th Indian Infantry Brigade, 32nd Army Tank Brigade and the 4th Anti-Aircraft Brigade.[60] Tobruk had withstood a siege of nine months, before being relieved by Operation Crusader in December 1941. Allied leaders expected it to be able to hold out for two months with the supplies in the fortress.[61] Auchinleck viewed the defence of Tobruk as non-essential and had already told Neil Ritchie that he did not intend to hold it at all costs.[62]
In February 1942 the Army, Navy and Air Force Commanders-in-Chief in Cairo had agreed that Tobruk should not stand another siege. Given this and the subsequent emphasis on building strength at the Gazala position for Operation Buckshot, which was forestalled by Operation Aïda, the defences at Tobruk had not been maintained in first rate condition.[63] Seven days later, on 21 June, in circumstances that even with the benefit of a court of enquiry remain obscure and contradictory, 35,000 Allied troops (including the South African 2nd Division) surrendered to General Enea Navarrini.[64]
Aftermath
Analysis

With the capture of Tobruk, the Axis gained a port nearer the Aegean–Crete route and a large amount of British supplies. If the British could not stop the Germans in Egypt, they would take the Suez Canal (forcing Britain to use supply lines twice as long, often targeted by U-boats) and potentially drive for the oilfields in the Middle East. Hitler rewarded Rommel with a promotion to the rank of Field-Marshal, the youngest German officer ever to achieve this rank.[65] Rommel remarked he would have preferred Hitler had given him another panzer division instead.[66]
Churchill wrote,
<templatestyles src="Template:Blockquote/styles.css" />
This was one of the heaviest blows I can recall during the war. Not only were its military effects grievous, but it had affected the reputation of the British armies.
— Winston Churchill[67]
Auchinleck dismissed Ritchie on 25 June and assumed command of the Eighth Army through the First Battle of El Alamein, where he stopped Rommel's advance.[68] In August, Auchinleck was replaced as the Eighth Army commander by the XIII Corps commander, Lieutenant-General William Gott and as C-in-C Middle East Command by General Sir Harold Alexander. Gott was killed when his aircraft was shot down and Lieutenant-General Bernard Montgomery was appointed as his replacement.[69]
Casualties
The Eighth Army lost 50,000 men killed, wounded or captured, including c. 35,000 prisoners lost at Tobruk[70][71] Axis casualties were 3,360 Germans and a smaller number of Italian losses.[72] On 30 June, the Afrika Korps reported that Axis tank losses were c. 400 and that only 44–55 German tanks were operational, the Italian XX Corps was down to fifteen tanks and the 90th Light Afrika Division had only 1,679 men left.[73][74] The Eighth Army lost thousands of tons of supplies, nearly 800,000 rounds of artillery ammunition, nearly 13 million rounds of small-arms ammunition and a huge number of tanks. Hundreds of damaged tanks had been left behind when armoured regiments retreated and it was estimated that 1,188 tanks had been lost in 17 days. On 22 June, the Desert Air Force had 463 operational aircraft, 420 of them in the Middle East, the Germans 183 and the Italians 238, with another 174 in reserve and 500 in the Mediterranean excluding Italy.[75] The Royal Army Ordnance Corps recovered 581 tanks up to 19 June, repaired 278 and sent 222 back to Egypt (326 being US-made tanks). The British were reduced to about 185 operational tanks by the end of the battle and shuffling operational tanks and crews between units disrupted unit organisation. Seven field artillery regiments, 6,000 lorries and two tank repair workshops (which had been moved into Tobruk) were lost. By 1 July, the Eighth Army was back at El Alamein, with 137 serviceable tanks, 42 en route from workshops and 902 tanks waiting to be repaired.[76][77]
Subsequent operations
Panzerarmee Afrika began Unternehmung Aïda (Operation Aïda) an advance upon Egypt, while the Eighth Army fell back to El Alamein. Auchinleck decided not to hold Mersa Matruh, choosing to fight a delaying action with X and XIII corps. The Afrika Korps was delayed at Mersa Matruh but signal failures led to disorganisation and the X Corps line of retreat along the coast road being cut off. The corps broke out at night to the south and worked its way around the German positions, collided with Axis forces several times and lost more than 6,000 prisoners, forty tanks and a large quantity of supplies.[78] Auchinleck had ordered the bulk of the Eighth Army to retire another 160 kilometres (99 mi) to El Alamein, 100 kilometres (62 mi) from Alexandria. The retirements brought the Eighth Army closer to its base and the Qattara Depression, south of El Alamein closed the southern flank. The Allied and Axis forces fought the First Battle of El Alamein, the Battle of Alam el Halfa and the decisive Second Battle of El Alamein. Operation Agreement, a British landing at Tobruk during the night of 13/14 September, to rescue Allied prisoners, was a failure.[79]
Orders of battle
See also
Footnotes
- ↑ Gruppe Crüwell was part of Panzer Army Afrika but Rommel temporarily split the force in half, Crüwell commanding the infantry formations along the original front line, while Rommel joined the mobile forces in the flanking move. After Crüwell was captured on 29 May 1942, Gruppe Crüwell was placed under the temporary command of Field Marshal Albert Kesselring, who had been visiting the front.[81]
Citations
- ↑ Hinsley, pp. 324–325
- ↑ Hinsley, pp. 348, 418
- ↑ Hinsley, pp. 335–336
- ↑ Hinsley, p. 334
- ↑ Hinsley, p. 330
- ↑ Playfair, 1960, pp. 139–153
- ↑ Playfair 1960 pp. 197–198, 216–217
- ↑ Lewin p. 109
- ↑ 9.0 9.1 Lewin p. 112
- ↑ Clifford, pp. 237–238
- ↑ Clifford, pp. 238–239
- ↑ Playfair, p. 114
- ↑ 13.0 13.1 Barr, p. 13
- ↑ 14.0 14.1 Carver, p. 167
- ↑ Creveld, 1977, pp. 192–193
- ↑ Creveld, 1977, pp. 193–195
- ↑ Lewin p. 108
- ↑ Playfair 1960, p. 223
- ↑ Toppe, p. A-8-18–19
- ↑ Mackenzie, p. 541
- ↑ Toppe, p. A-8-19
- ↑ Montanari, p. 208
- ↑ Playfair 1960 p. 223
- ↑ Carver, 1966, p. 219
- ↑ Ford, p. 35
- ↑ Greene and Massignani, p. 156
- ↑ Montanari, p. 206
- ↑ 28.0 28.1 28.2 28.3 Playfair 1960, p. 224
- ↑ Toppe, p. A-8-25
- ↑ Playfair 1960, pp. 223–224
- ↑ 31.0 31.1 31.2 Mead, p. 298
- ↑ Playfair 1960, p. 225
- ↑ 33.0 33.1 Avalanche Press website Ariete at Gazala Accessed 25 November 2007
- ↑ Clifford, p. 247
- ↑ Montanari, p. 211
- ↑ 36.0 36.1 Toppe, p. A-9-1
- ↑ Toppe, pp. A-9-5–A-9-7
- ↑ Clifford, pp. 260–262
- ↑ 39.0 39.1 Playfair 1960, p. 237
- ↑ Toppe, p. A-9-6
- ↑ Playfair, 1960, pp. 226–228
- ↑ The Rommel Papers, US version, p. 212
- ↑ Mackenzie, p. 548
- ↑ Hinsley, p. 373
- ↑ Playfair 1960, pp. 232–233
- ↑ Playfair 1960, p. 233
- ↑ 47.0 47.1 47.2 Playfair 1960, p. 234
- ↑ Playfair 1960, pp. 233–234
- ↑ Playfair 1960, pp. 235–236
- ↑ von Mellenthin p. 107
- ↑ Hoffman p. 77
- ↑ Clifford, p. 264
- ↑ Playfair 1960, pp. 242–243
- ↑ Mitcham, 2007, p. 98
- ↑ The South African Military History Society Newsletter. [1] No. 431. January 2012.
- ↑ Greene and Massignani 1994, p. 163
- ↑ Mackenzie, pp. 554–555
- ↑ Clifford, pp. 269–272
- ↑ Mackenzie, pp. 556–559
- ↑ 60.0 60.1 Mackenzie, p. 561
- ↑ Mackenzie, p. 559
- ↑ Bierman and Smith (2002), p. 178
- ↑ Playfair 1960, p. 261
- ↑ Bierman and Smith (2002), p. 213
- ↑ Playfair 1960, p. 275
- ↑ Rommel 1953, p. 233.
- ↑ Barr, p. 1
- ↑ Playfair, 1960, pp. 285, 331–357
- ↑ Playfair, 1960, pp. 367–370
- ↑ Barr, p. 16
- ↑ Ford, 2005 p. 10
- ↑ Carver, p. 249
- ↑ Ellis, p. 57
- ↑ Barr, 2005, p. 39
- ↑ Playfair 1960 p. 283
- ↑ Playfair, 1960, pp. 238–239
- ↑ Barr, 2005, pp. 39–40
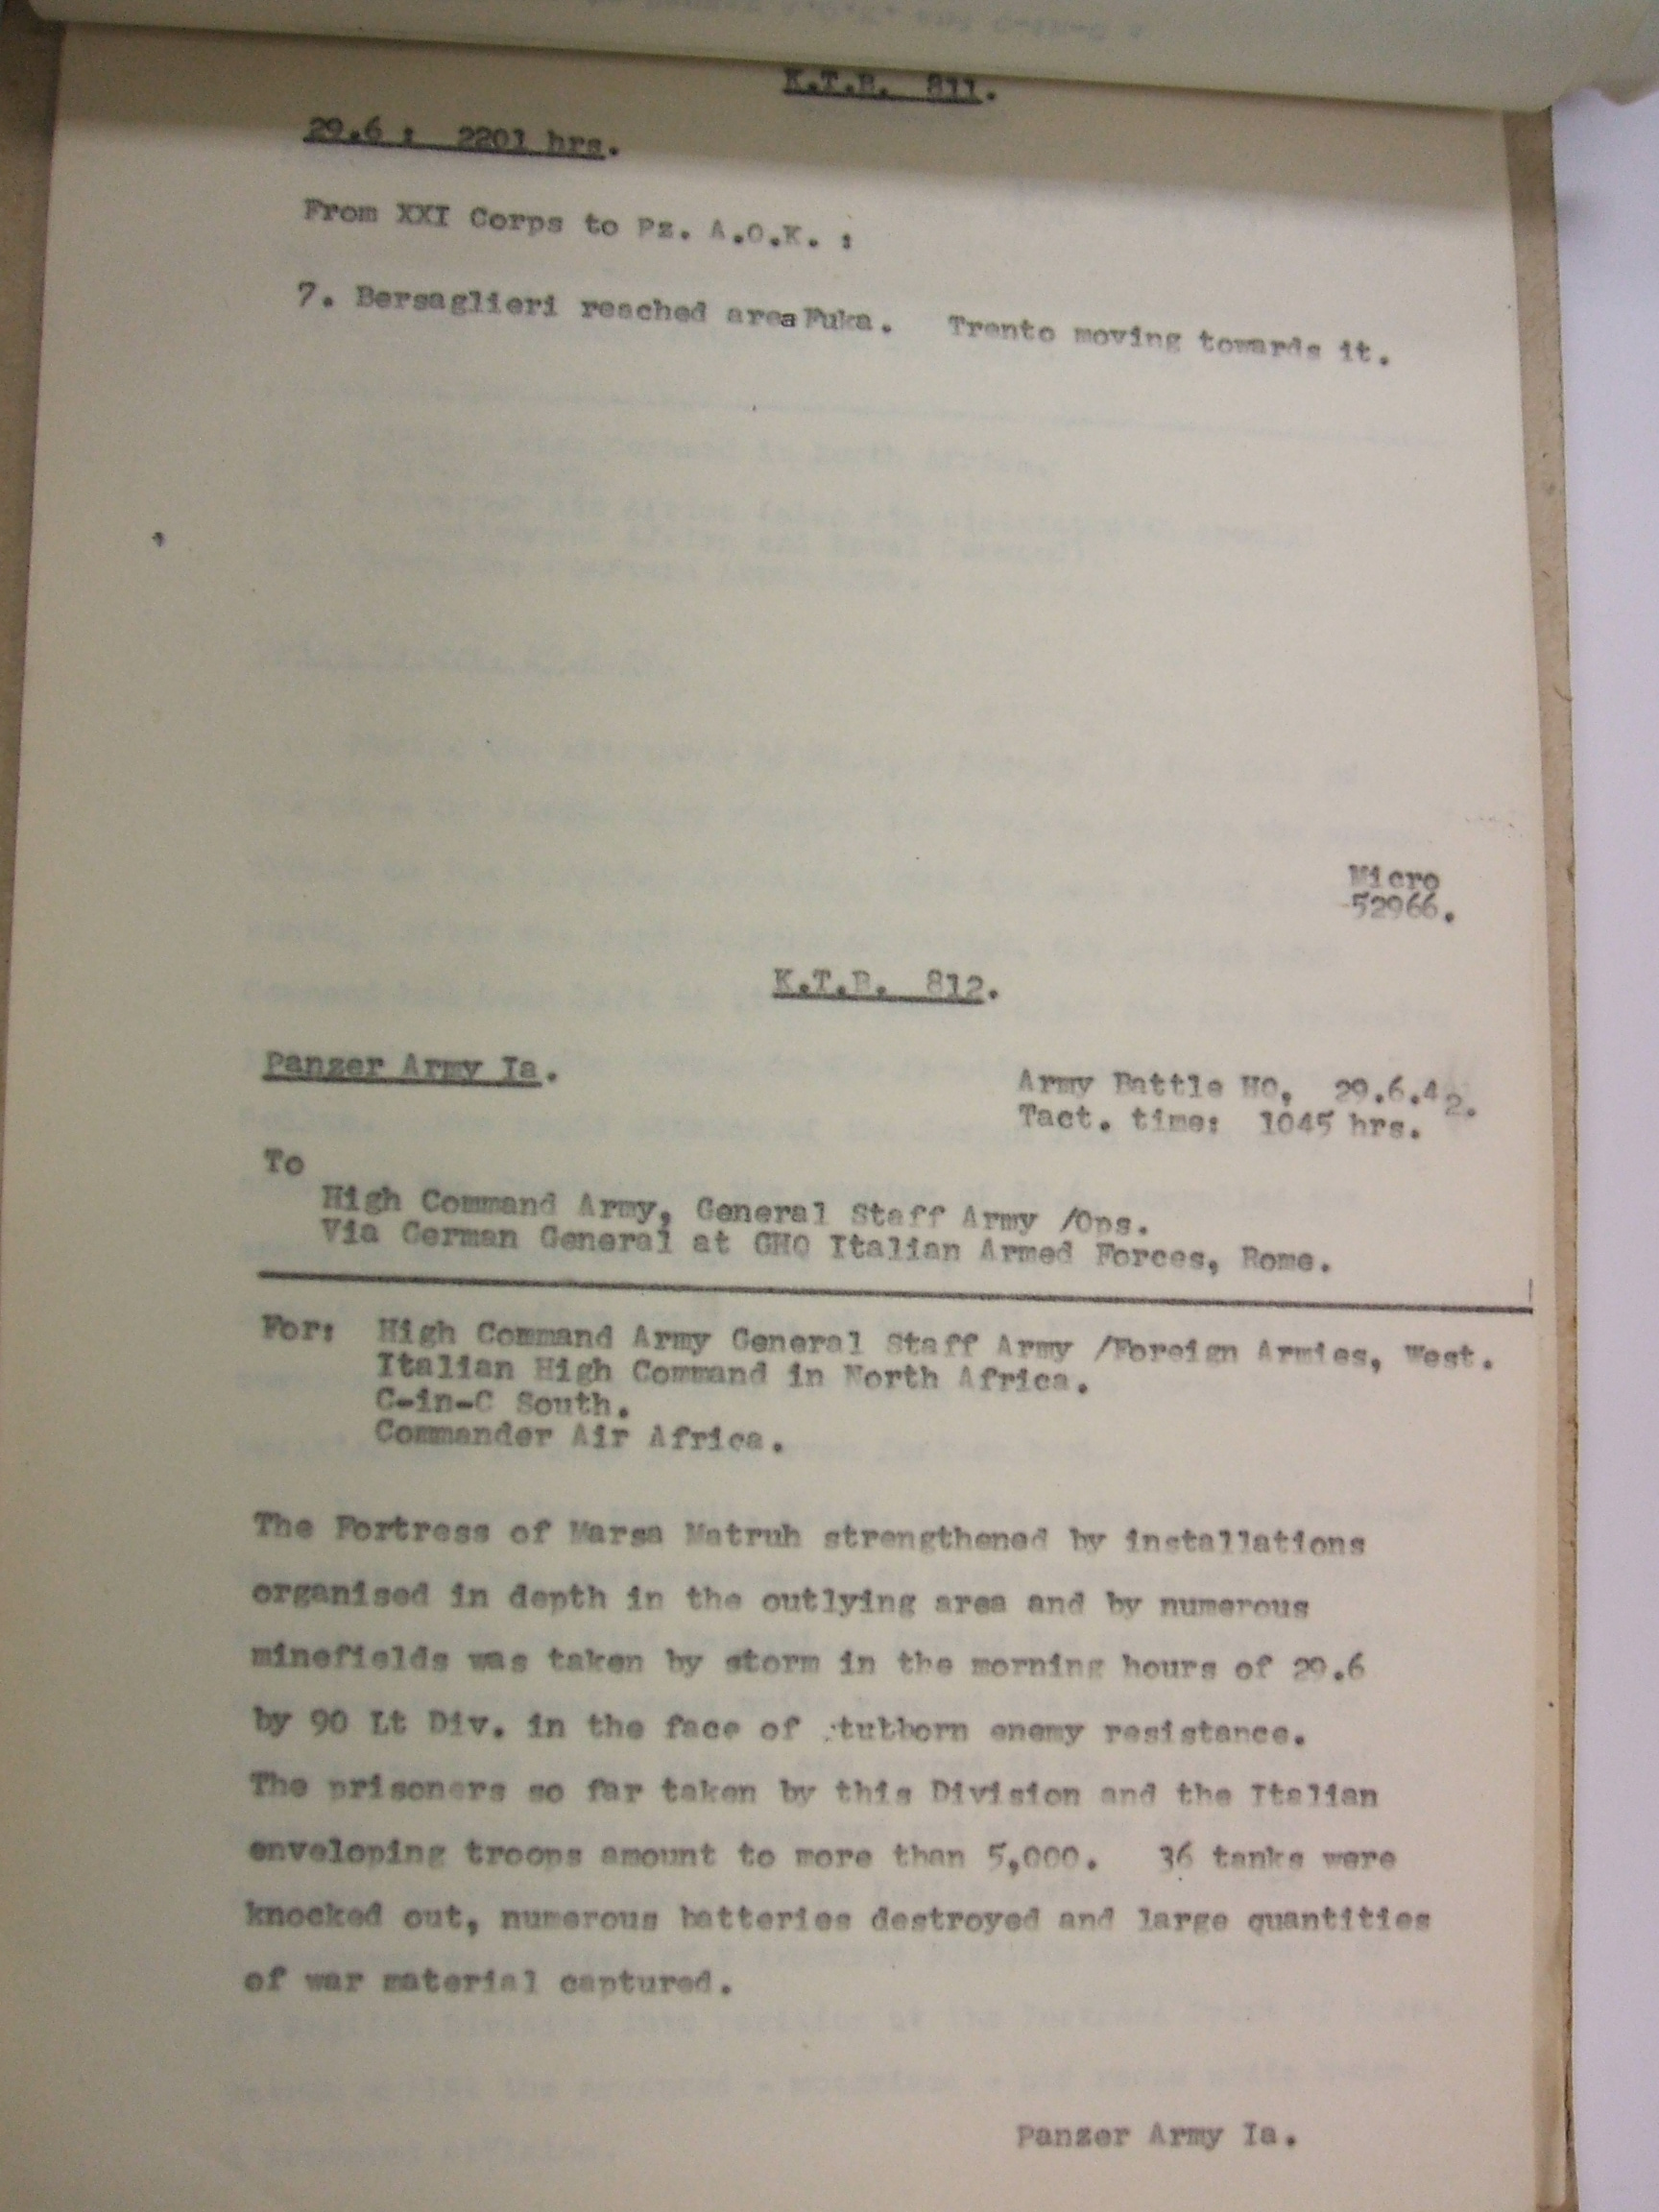
- ↑ Panzer Army Africa Battle Report dated 29 June 1942 K.T.B. 812 page 1 and page 2
- ↑ Playfair, 1966, pp. 20–23
- ↑ Playfair 1960, p. 227
- ↑ Playfair 1960, pp. 227–228
Bibliography
- Books
- Lua error in package.lua at line 80: module 'strict' not found.
- Lua error in package.lua at line 80: module 'strict' not found.
- Lua error in package.lua at line 80: module 'strict' not found.
- Lua error in package.lua at line 80: module 'strict' not found.
- Lua error in package.lua at line 80: module 'strict' not found.
- Lua error in package.lua at line 80: module 'strict' not found.
- Lua error in package.lua at line 80: module 'strict' not found.
- Lua error in package.lua at line 80: module 'strict' not found.
- Lua error in package.lua at line 80: module 'strict' not found.
- Lua error in package.lua at line 80: module 'strict' not found.
- Lua error in package.lua at line 80: module 'strict' not found.
- Lua error in package.lua at line 80: module 'strict' not found.
- Lua error in package.lua at line 80: module 'strict' not found.
- Lua error in package.lua at line 80: module 'strict' not found.
- Lua error in package.lua at line 80: module 'strict' not found.
- Lua error in package.lua at line 80: module 'strict' not found.
- Lua error in package.lua at line 80: module 'strict' not found.
- Lua error in package.lua at line 80: module 'strict' not found.
- Lua error in package.lua at line 80: module 'strict' not found.
- Lua error in package.lua at line 80: module 'strict' not found.
- Lua error in package.lua at line 80: module 'strict' not found.
- Lua error in package.lua at line 80: module 'strict' not found.
- Lua error in package.lua at line 80: module 'strict' not found.
- Websites
- Lua error in package.lua at line 80: module 'strict' not found.
- Lua error in package.lua at line 80: module 'strict' not found.
Further reading
- Lua error in package.lua at line 80: module 'strict' not found.
External links
| Wikimedia Commons has media related to Battle of Gazala. |
- Articles containing German-language text
- Use dmy dates from July 2013
- Commons category link is defined as the pagename
- Conflicts in 1942
- 1942 in Libya
- Western Desert Campaign
- Libya in World War II
- Battles of World War II involving the United Kingdom
- Battles and operations of World War II involving South Africa
- Battles and operations of World War II involving India
- Battles of World War II involving France
- Battles of World War II involving Italy
- Military history of India during World War II
- Battles of World War II involving Germany
- Battle honours of the King's Royal Rifle Corps
- Erwin Rommel